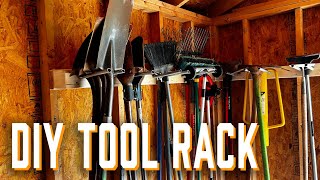
 In this video I will be building a storage rack for all of my yard tool. This rack is fairly cheep as far as storage options go and it will save on valuable floor space in your garage or shed. Check out the video to see how this can be done.
Support my Channel on Patreon at – https://www.patreon.com/user?u=32924378
And get access to Shoutout, Giveaways, and much more.
Follow me on Instagram and Facebook for more content.
Instagram: Simon_Says_DIY
Facebook: Simon Says DIY
Please do not attempt the processes in this video without adequate training and equipment. Proceed at your own risk. While we have made every attempt to ensure that the information contained on the video channel is correct, the Creator is not responsible for any errors, or for the results obtained from the use of this information. In no event will the Creator be liable to you or anyone else for any decision made or action taken in reliance on the information on the video channel, or for any consequential, special or similar damages, even if advised of the possibility of such damages. Seek professional assistance should you require it. Please stay safe and be careful.
#SimonSaysDIY #ShedStorage #ToolStorage
Nice idea fitting all your tool hanger at head height, a nice accident just waiting to happen.
you should have removed the jagged edge of the conduit from your cuts or put rubber over the ends. this looks potentially dangerous…
Are the pipes just loose in the hole or fastened some how?
That’s looks great
Is that metal or plastic conduit pipe? What are you cutting it with? Great idea, overall.
Nice…Easy & Functional. 🛠
Nice!! Great use of space!!
love the simplicity, cutting through all the bs 🙂
I used 2×2 s ripped a 2×4 to save cost and used heavy pvc so it won’t rust and was cheaper
Hmm so if i cut them to fit between the studs and use the conduit idea then the tools can be recessed a little better.
Nonetheless nice idea, thank you!😊
very nice
Very nice, cheap and easy idea.
Nice. Why deck screws though?
Great Idea! Im now a new Subscriber! Thanks for the Post!
Precisely what I was thinking about doing. Thanks for the proof of concept here. Nicely done! A little time and $20 beats the $$$ on Amazon for rack systems only half as good as this one.
I added a second rack about 2-3 feet directly below the first. I hang a few things there too but also I found that adding a pair of pipes on the lower rack in line with the shovel handles keeps the shovels in good order.
I followed your suggestion and just drilled a series of holes 3” apart to make it easily adjustable. Works great!
What size metal conduit did you use?
It looks great
better ideas out there.
Nice! I’m going to build one just like this! I think you’ll find, as time goes on, that if you have the wall space to make room for more spaces would be beneficial. Some of the shovels do different jobs so keeping the spades seperate from the pointed shovels will help. Likewise with garden rakes and leaf rakes. Just so you don’t have to hunt to the back of your piles 🙂
I think I’ll build this! Thanks for the idea!
Great ideas! Neat storage of tools for convenience and safety! 😄 I learn so much every time I watch your videos. Wish I had known these tricks when I was younger!😆❤🛠
Good job!
Great idea, I’m doing it today Thanks
Great idea. I’ve got plenty of conduit/curtain rods hanging about doing nothing. Now I’ve got a purpose for these. Saved me a bit of money buying not having to buy the hooks.
Such a clever idea. Thanks for sharing 😊
I like it @simonsaysdiy! What size conduit did you use 1/2" or 3/4"?
Love this very doable project. Thanks for sharing!
❤
Nice idea with the pipes. If you’re in a dollar store, those retractable prongs would be a better idea as well. Comes coated with rubber.
Good idea, thanks..
OMG! I’d planned to buy lumber this Saturday to do the double-2×4 hangers until I just found this. Nice job! So, I hung 4×8 OSB panels on my studs. I’m trying to decide if I should remove it in order to do this project or just leave it and drill through it. Any thoughts on that? The one advantage to uninstalling this one piece is that I could put some shelving in between
the studs.
You doubled up on the boards, I only used one. You used Conduit piping, I used 12 inch long Wood screws. I love your idea to though.
I think there was a missed opportunity to not utilize the space in between the studs. I saw another video where she put the shelves/racks in between so things looked much for flush.
You might have a shovel problem
Great idea! Can you give any specifics on the type of conduit you used? I’ve never purchased it before but there appears to be a few different types.
Simple and cool 😎
If you have a small shed this would take up too much wall space.
It looks great
Looks great
if only I had seen this before starting some complicated version with 2 x 4 arms. ahhhh. will be doing this with the rest of my garden tools . frickin genius simplicity.
How far are the holes apart from each other